
 português
 English
 français
 Deutsch
 русский
 italiano
 español
 Nederlands
 العربية
 Türkçe
 Polski

Instalar um assento sanitário pode parecer uma tarefa simples, mas fazê-lo corretamente garante conforto, segurança e durabilidade. Seja para substituir um assento antigo e desgastado ou para um novo estilo, este guia passo a passo explicará tudo o que você precisa saber.
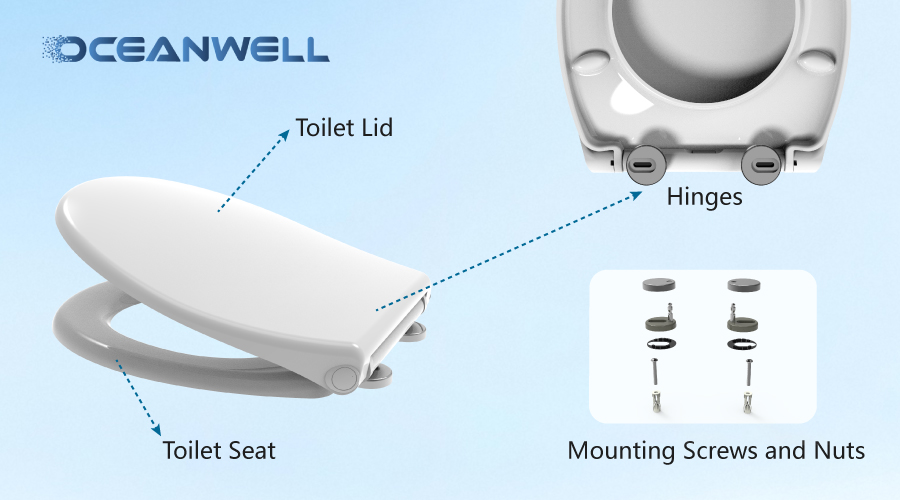
① Compreendendo os componentes de um assento sanitário
Um conjunto padrão de assento sanitário consiste em várias peças principais:
- Assento sanitário: A parte em que você se senta, geralmente feita de plástico, madeira ou resina.
- Tampa do vaso sanitário: A capa que fecha sobre o assento, geralmente presa com dobradiças.
- Dobradiças: Mecanismos de metal ou plástico que conectam o assento e a tampa ao vaso sanitário, permitindo que eles subam e desçam.
- Parafusos e porcas de montagem: Eles fixam o assento ao vaso sanitário. Podem ficar visíveis na parte superior ou escondidos embaixo do vaso.
- Arruelas: Pequenos discos de borracha ou plástico que evitam vazamentos e prendem os parafusos firmemente.
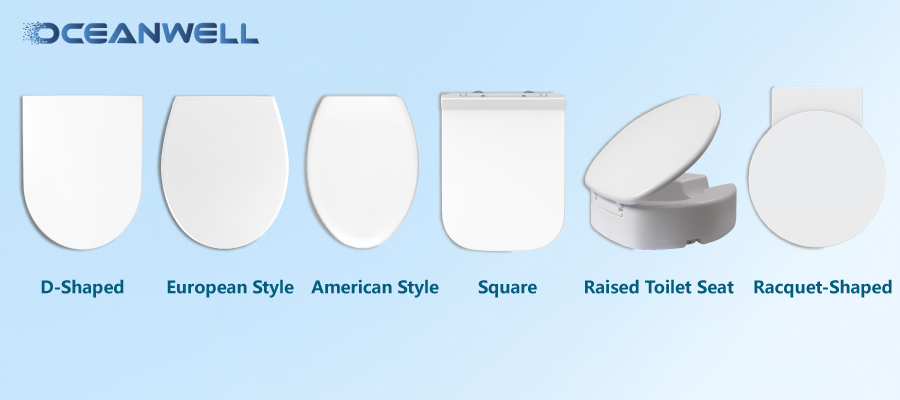
2 Classificações de formas
Os assentos sanitários vêm em vários formatos para se adaptarem a diferentes vasos sanitários. Os mais comuns incluem:
- Assento sanitário em formato de D: Lembra a letra "D", com a parte traseira reta e a frente curva. Popular em banheiros modernos.
- Capa para assento sanitário estilo europeu: Geralmente mais compacto e arredondado, projetado para se adaptar a vasos sanitários de padrão europeu.
- Estilo americano: Geralmente maior, com formato mais alongado ou oval, combinando com a maioria dos modelos de vasos sanitários americanos.
- Assento sanitário quadrado: Apresenta bordas retas e afiadas para um visual contemporâneo, geralmente combinado com vasos sanitários quadrados.
- Trapezoidal: Tem um formato ligeiramente afilado, mais largo na frente e mais estreito atrás.
- Em forma de raquete: Combina bordas arredondadas com um design angular sutil, semelhante a uma raquete de tênis.
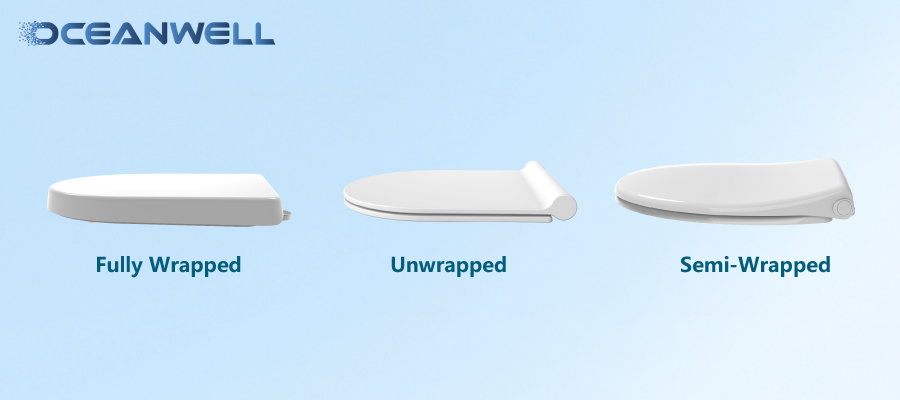
3 Diferenças entre designs não embalados, semi-embalados e totalmente embalados
Esses termos se referem à maneira como o assento cobre a borda do vaso sanitário:
- Desembrulhado: O assento fica diretamente sobre a borda da tigela, sem se estender além das bordas. É simples, mas pode deixar mais área da tigela exposta.
- Semi-embrulhado: O assento cobre parcialmente a borda frontal da tigela, oferecendo um equilíbrio entre cobertura e simplicidade.
- Totalmente Envolvido: O assento cobre completamente a borda da tigela, proporcionando uma aparência uniforme e melhor higiene ao reduzir espaços onde a sujeira pode se acumular.
④ Como escolher o assento sanitário certo
Selecionar o assento sanitário perfeito envolve considerar estes fatores:
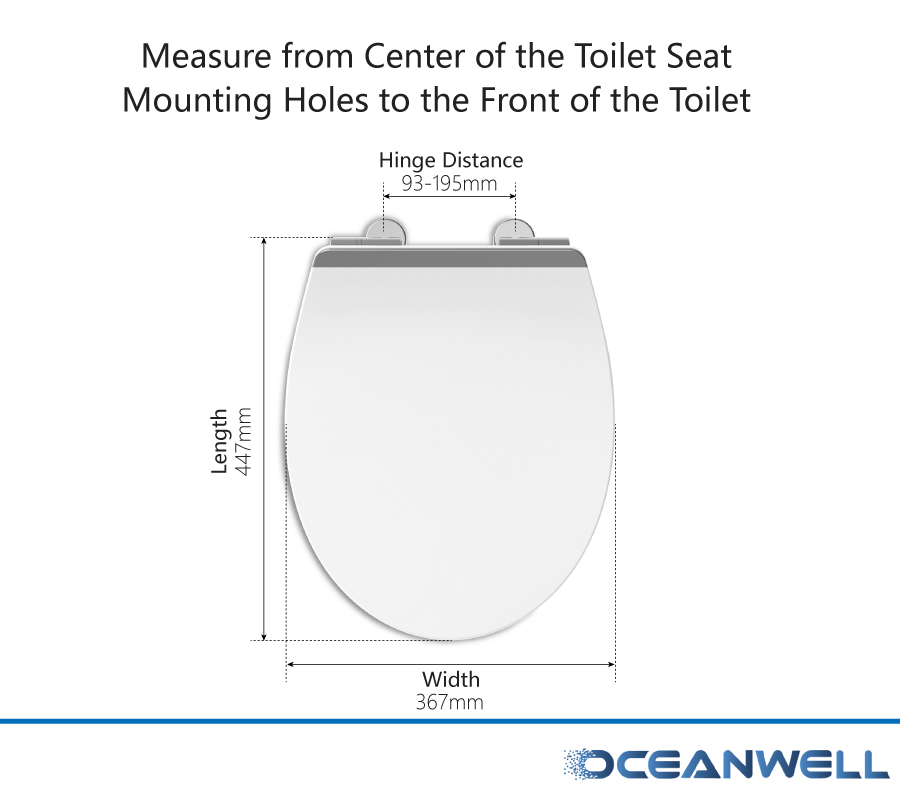
- Meça seu vaso sanitário: Verifique o comprimento e a largura do vaso sanitário para garantir um encaixe perfeito. Meça a distância dos parafusos (onde o assento é fixado) até a parte frontal do vaso.
- Material: Os assentos de plástico são acessíveis e fáceis de limpar; os de madeira oferecem aconchego e estilo; os de resina são duráveis e resistentes a manchas.
- Características: Opte por dobradiças de fechamento suave para evitar batidas, mecanismos de liberação rápida para facilitar a limpeza ou materiais antibacterianos para maior higiene.
- Estilo e cor: Combine o assento com a decoração do seu banheiro. Branco e off-white são clássicos, enquanto cores fortes ou estampas podem dar um toque único.
⑤ Ferramentas essenciais e etapas de instalação
Ferramentas necessárias:
- Chave de fenda (chata ou Phillips, dependendo dos parafusos)
- Chave ajustável
- Alicate (opcional, para porcas difíceis)
- Pano de limpeza
- Limpador suave
Etapas de instalação:
1. Remova o assento antigo:
- Localize os parafusos de montagem (na parte superior da tigela, perto das dobradiças, ou na parte inferior).
- Desaparafuse as porcas (talvez seja necessário segurar o parafuso por cima enquanto gira a porca por baixo).
- Levante o assento e a tampa antigos.
2. Limpe a área:
- Limpe a área de montagem com um limpador suave para remover sujeira, resíduos e resíduos antigos.
3. Alinhe o novo assento:
- Coloque o novo assento na tigela, certificando-se de que as dobradiças estejam alinhadas com os furos de montagem.
- Insira os parafusos pelos furos (de cima para baixo).
4. Proteja o assento:
- Aperte as porcas nos parafusos por baixo. Aperte-as firmemente, mas não em excesso, para evitar rachaduras na tigela.
- Verifique se o assento está nivelado e não balança. Ajuste se necessário.
5. Teste o assento:
- Levante e abaixe o assento e a tampa algumas vezes para garantir que eles se movam suavemente e permaneçam no lugar.
⑥ Cuidados diários com o assento do seu vaso sanitário
- Limpeza regular: limpe o assento semanalmente com um pano úmido e sabão neutro. Para uma limpeza mais profunda, use um spray desinfetante ou lenços umedecidos.
- Evite produtos químicos agressivos: produtos de limpeza abrasivos ou alvejantes podem danificar o acabamento do assento com o tempo.
- Verifique se há parafusos soltos: aperte os parafusos de montagem periodicamente para evitar oscilações.
- Manuseie com cuidado: evite bater a tampa, mesmo com dobradiças de fechamento suave, para prolongar sua vida útil.
Seguindo estes passos e selecionando um assento que se adapte às suas necessidades, você desfrutará de um banheiro mais confortável, higiênico e visualmente atraente. Para opções avançadas, considere assentos sanitários inteligentes com superfícies aquecidas ou funções de bidê — basta garantir que sejam compatíveis com as dimensões da sua bacia.


 No. 33 Shishan North Road, Dongfu Street, Dongfu Town, Haicang Dist., Xiamen,Fujian, China
 +86 13605038522
 +86-592-5685085 ext.8010
 sales08@oceanwellxm.com
 +86 13605038522
 Rede IPv6 suporte